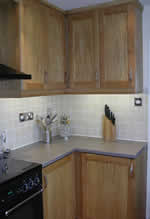
| How many times have you looked through numerous kitchen cabinet catalogues and still not found what you are looking for. Either they are not suitable or when you add up all the hidden extras the unit you thought was only going to cost £60 is more like £260. One simple way to change all that is to build the units yourself. It sounds ambitious but it really is quite simple. Provided you have some basic wood working skills and a few tools like a table saw, router, sander you are half way there. Build the units to the size you needThe main advantage in building the units yourself enables you to efficiently use the available space. You don’t have to use different combinations of unit just to achieve the desired effect. If you need a 478mm unit you just build it.
|
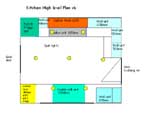
| Plan the kitchen layout As with other projects we have mentioned good planning is a key factor to success. Measure the kitchen and draw a scale plan. Next decide on all the appliances you require such as dishwasher, cooker, fridge, washing machine. Other information will be required such as the number for electrical power points, lighting spotlights and under the counter systems. How will the lighting be controlled? Is there to be an extract hood and how is the electricity connected to it. With all this information at your fingertips you can lay out your kitchen. You will need lots of consultation with the users and often several layouts may have to be done to reveal the best design. Think ‘volume’ up until now you have been limited to the standard height of units that the manufactures can provide. Building the wall units up the ceiling has the advantage of using all the space available and avoids areas for dust and grease collection. When you have arrived at what you consider is your best plan the add all the services information on the drawing check how hot and cold water will be provided to the sink and washing machines. How will the drainage be routed. You will need to position the power points for portable appliances like kettles, toasters as well as the power distribution for the fixed appliances. Remember that cooker will need a higher capacity supply involving a heavier duty cable which will have a dedicated circuit back to the main electrical distribution board. Think carefully how you are going to route these services and remember that one day you may need to gain access to repair a leak in a pipe so don’t make the building in process too permanent. Often it is asked how long is it likely to be before a pipe may start to leak. The truth is nobody knows. It could be 30mins or 30 years after you have completed the work.
|
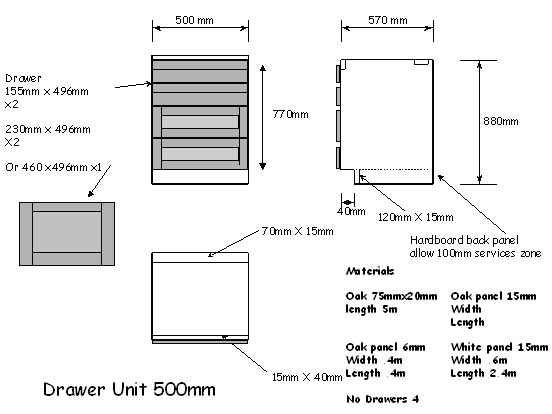
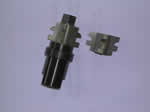
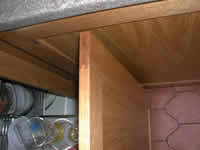
Hopefully by now you have finalised the plan and you can start work detailing the kitchen cabinets. Again good planning is essential. Draw each kitchen unit you plan to build. If you have the use of a computer and a Microsoft Power Point drawing package then use this for detailing each cabinet. One sheet for each unit and below is an example of a kitchen base drawer unit . The drawings will be useful to coordinate all the information so that the heights, doors etc. all look alike creating a uniform designed kitchen. The drawings will also form a good reference sheet to list out all the key materials. Even if you want the use expensive hard work for the construction of the various cabinets you can use some different materials where the work is not exposed. Manufactures have to make their units good enough to be seen from all sides. You can make economies for example on a long run of cabinets where the end side panel may be exposed only this needs to have a high quality finished hard wood panel. To source your hard wood you need to go to a specialist supplier. This is not a job for a DIY superstore. One supplier we would recommend is SL Hardwoods Ltd from Croydon Surrey. This type of supplier can provide woods to your specification and you may choose English or American White Oak or Beech to name a few. As mentioned before using different wood for the interior of the units is an option and white finished chipboard may prove more practical as it will allow the surfaces to be wiped down easily. When ordering your hardwood make sure you include some veneer edging tape so that the edges of any white board can be finished to look the same as the hardwood. When you start to cut out the materials it is important to be very accurate. It is amazing how an error of a few millimetres can show. Take time to set up you power tools and remember the old saying measure twice but cut once. Joints for the door frames can be made from either using ‘male’ and ‘female’ router cutters ( see picture ) or by cutting standard mortise and tenon joints. Then each frame can be finally recessed with a grove to take the door panel.
|
| Special routers used
for door frames For the best wood treatment we would recommend Danish oil. Follow the instructions for use carefully. For a good finish apply several coats over a period of time. Don’t rush this process as the more time you take the more professional the finish will look. If you are refurbishing an existing kitchen and you are still trying to use the kitchen on a daily basis the you will need to make a range of units to complete say one side of the kitchen otherwise you will be in constant chaos and find it difficult to complete sections of so you can reuse the kitchen quickly again.
|
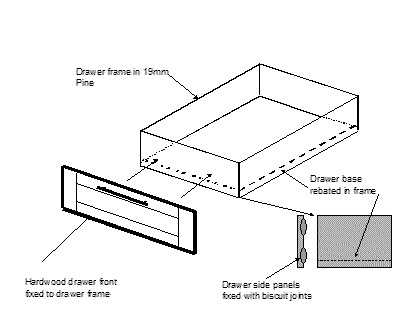
Making drawers When making the drawers for the base units pine timber is hard wearing and a practical wood to use for the construction. Also 15mm white faced chipboard makes a strong drawer base which will not fall out when a few heavy items are placed in the draw. Fit the base of the drawer by rebating the drawer frame. Biscuit joints are a good solution for the drawer frame joints. When the drawer carcass is complete the drawer hardwood
face panel can be fitted. It is advisable to use the
metal drawer runners which allow the drawers to work
smoothly. Compare Prices on Kitchen Door Fittings. Compare Prices on Kitchen Units
If you have a sink to install mark out the hole required and using a jig saw cut out the opening in the work top. Make sure the blade does not bend other wise you will get a distorted hole which may prove difficult to clamp the sink in position. Connecting the hot and cold water services is best completed with flexible connections and the plastic waste is fairly easy to cut and install if you use push fit fittings. Don’t forget that you might need to install tee connections for other appliances like washing machine and dishwasher. Fix the worktop to the base unit by screwing from below now with the worktop complete this forms a level surface to use to support the wall cabinets.
|
Installing wall units When installing the wall units use the ‘screwfix’ clamps in reverse to act a lifting jacks. This makes it an easier job to install and allows you to accurately align the units before fixing to the wall. Once the first wall unit is up then the adjoining units can be installed in the same way but use a couple of extra clamps to hold the adjacent units together so that they match up perfectly. Doors can be fitted afterwards and finally adjusted
so they are level and Another tip if you are installing worktop lighting under the wall cabinets make sure that the wiring is in position in the wall or at the back of the unit. When all the units are in position you can link up the cable at the top and conceal the wiring with a cornice moulding.
Once all your units are installed then you are on the home straight for completion. You can now tile the walls working up from the worktop. For best results it is advisable to use tile adhesive for fixing the tiles with spacers to give an even distribution. When the adhesive is dry use a separate grout and with a wiper blade scrap off the excess and when almost dry wipe with a damp sponge to remove the remaining grout. Then when completely dry give a final wipe over a polish the tiles. To protect the grout from staining it is recommended to coat the grout with a specialist clear sealant. This keeps the grout white and prevents it from being porous. |
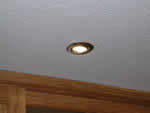
Lighting Other finishes to the walls can be applied now, also
fit any recessed lighting in the ceiling. Halogen mains
units are For more information on lighting your kitchen click here
|
 operate
correctly.
operate
correctly. 
 recommended.
these make an excellent choice and avoid having to install
low voltage transformers.
recommended.
these make an excellent choice and avoid having to install
low voltage transformers.